Announcing New CodeDemo Feature – ZoomIt Integration

I am very excited to announce a new feature of CodeDemo. This feature integrates with ZoomIt and enables you to use ZoomIt much more fluently.

ZoomIt is a great presentation tool. It helps speakers and presenters deliver very effective presentations. But many presenters are not using this great tool as much and as effectively as it can be used. The reason is that ZoomIt has a bit of a learning curve. It takes practice to use it fluently. You have a lot going on in your mind while you are doing a presentation. Using ZoomIt distracts you from your presentation. Practice helps you get over this distraction. A lot of presenters use ZoomIt very effectively with practice. But for the rest of us, ZoomIt mastery has been elusive.

I have experimented and practiced (a lot) with several different ways to gain fluency with ZoomIt, including using custom keyboard combinations, but I could never get to the point where using ZoomIt feels like second nature. I realized that the mental and visual shift it takes to locate the keyboard combination and execute ZoomIt command with two fingers breaks the flow of the presentation and causes the distraction. I came up with a new way to use ZoomIt that has helped me immensely. And I added that as a feature in CodeDemo, so now you can use this method too.

Some of you are familiar with CodeDemo. For those who are not, it is another new tool for presenters. I created this tool to make it easier to use code snippets in your presentations. ZoomIt integration is a new feature of CodeDemo. To use this feature –

  1. Start ZoomIt. If ZoomIt is not running, the commands will be simply ignored.
  2. If you use custom keyboard combinations in ZoomIt, you will need to reset them back to defaults –
  • Ctrl+1 to Zoom
  • Ctrl+2 to Draw
  • Ctrl+4 to LiveZoom
  1. Start CodeDemo.
  2. Open a demo file. Any demo file will do. You must have a demo file open to call ZoomIt. If QuickStart.txt is already open in CodeDemo, you do not need to load another file. You can open Quickstart.txt file by clicking on the “Quickstart” button in the top menu.
  3. Now the key step – do a quick double-tap on the CTRL key. ZoomIt will be invoked and you will see a zoomed-in portion of your screen.
  4. At this point, you use ZoomIt as you normally do.
    • Click to freeze the visual.
    • Press Ctrl key and use the mouse to draw a rectangle on the screen.
  5. Double-tap on the CTRL key (or press ESCAPE key) to exit ZoomIt “Zoom”.
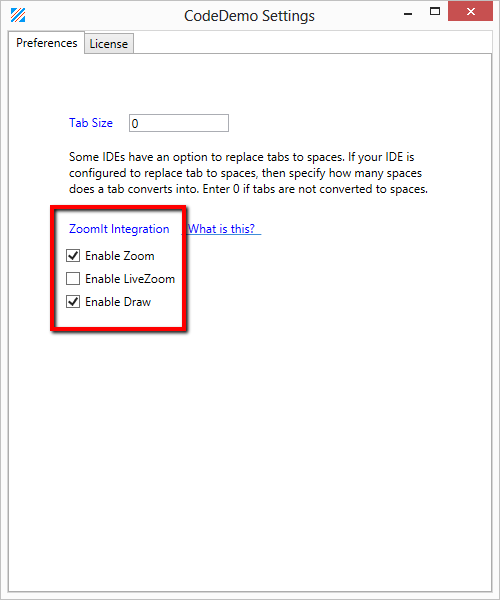
  6. You can also invoke ZoomIt “Draw” with a quick double-tap on the ALT key and ZoomIt “LiveZoom” with a quick double-tap on the SHIFT key. You may need to enable ZoomIt integration from the settings panel in CodeDemo :

Invoking ZoomIt with a quick double-tap using just the index finger (or thumb) did the trick for me. I do not have to direct my attention to the keyboard anymore. The CTRL key is right there at the bottom corner of my keyboard and I can invoke ZoomIt without moving my eyes, my hand or my mind. There is only one thing to remember while using ZoomIt from CodeDemo – The CTRL key. That’s all. That one key will take care of 90% of what you need, to become effective with ZoomIt.

You can get CodeDemo from http://www.codedemo.net.

Photo Credit : http://thenounproject.com/term/gift/13360/

Using DbUpdater with MySql

DbUpdater can be used with mysql.

Here are the files you need to jumpstart the integration – DbUpdater-MySql.zip

1. You might need to change the path to mysql.exe in mysql-exec.bat.

2. Modify values in mysql-sample-command-line.bat.

Make sure mysql.data.dll is placed in GAC or in the same directory as DbUpdater.exe. Connector binaries can be downloaded from here –
http://dev.mysql.com/downloads/connector/net/6.1.html

GUI Prototyping Tools

Special purpose UI prototyping tools, like the ones listed on C2 Wiki, offer a convenient blend of usability and flexibility. I have tried some of these tools. I was looking for something that –

  • doesn’t become unwieldy when used to prototype a large and complex GUI
  • allows me to use my own screenshots/images/icons
  • allows me to modify the prototype without making it a hair-pulling experience.
  • can prototype all aspects and artifacts of modern web and desktop interfaces, specially –
    • tree controls  – you will be surprised how many prototyping tools don’t have this. Pencil, I am looking at you 🙂
    • tabbed panels  – can you position your tabs at the bottom ? on the right edge ?
    • film strips
    • ribbons
    • NavBars

The one that met all these requirements and more (and blew me away) is Balsamiq Mockup.
Disclaimer : I requested and received a complimentary license from Balsamiq.

[youtube]zLysy3IPfFI[/youtube]

  • Balsamiq Mockup’s usability is what attracted me at first and then it was just a series of surprises, one after another.
  • You can click on the widget “legend” to toggle aspects of the widget on and off. Very slick !
  • You can link (aspects of) widgets to other mockups. This allows you to build some interactivity into your prototype. Very cool !
  • You can clone a mockup with a button click – to prototype a transition.
  • I could use my own images/screenshots and sketch them (basically,  applies a sketch transformation on the image) !!! If you think that sketchy look of the prototypes looks unfinished, you should read this.

Here are some things I wish I could have in Balsamiq –

  • name (and search for) individual widgets in my mockup
  • select multiple widgets by dragging over an area
  • auto-group when dropped on containers (or other widgets)
  • stretching container stretches everything in it, I wish I could have some control over it
  • register my own mockups as library widgets
  • zoom in and out

Just to be thorough, here are some other approaches I have used in the past –

  • Using a RAD tool like VisualStudio is great way to prototype. You have to be very proficient, like a GUI developer 😉 , with the tool of your choice. Otherwise, it is can be an excruciatingly slow approach. The best part of this approach is that the interactions can be prototyped seemlessly and some of the feasibility doubts can be cleared early on. The problem with this approach is that the prototype can be mistaken as the actual product and the effort /scheduling expectations of the stakeholders can become hard to manage. Read Joel Spolsky’s brilliant observations on The Iceberg Secret, Revealed. Also, when the prototype looks like a finished product, type of feedback you receive is usually not strategic, it is narrower. Read more about this on Creating Passionate Users article.
  • When you have an existing UI (perhaps from a 3rd-party library’s demos) that can become the basis for your new UI, it makes sense to use screenshots of your existing UI and modify them using image editors like Paint.NET or Photoshop or even MS Paint. It is a quick way to produce a prototype but the expected changes to the prototype must be minimal. Otherwise, you will find yourself spending long hours with your image editor.
  • General purpose drawing programs, like dia and Visio, can be used to create UI prototypes. With these type of tools, you will probably need to work with building blocks that are a bit too granular, although you may be able to procure widgets/stencils for some of these tools to make things easier. These tools have a some learning curve and less than fluid usability.

ReSharper vs CodeRush + Refactor Pro

I have been playing with JetBrains ReSharper (version 4.1) and DevExpress CodeRush + Refactor! Pro (version 3.2.2) lately. I wanted to decide on which one to go with. Here are some notes –

R# = ReSharper
CodeRush = CodeRush + Refactor! Pro

  • R# seems to be better for refactoring, because it does not assume that I follow a rigid work flow when writing code. For example, I don’t always decide on the class hierarchies upfront. I do discover them as I write code. So, when I discover that I need to extract a base class from the class I am working on, I can do so with R#. I couldn’t find a way to do extract a base/super class with CodeRush.
  • In R#, I can create an overloaded constructor using “Change Signature” refactoring (Ctrl+R, S). I couldn’t find a way to do this in CodeRush. CodeRush does allow me to create overloaded methods.

However, comparisons that only focus on how many refactorings each tool can do are not very important to me. After all, it should be easy for the individual missing refactorings to be implemented in the subsequent releases of these tools. I want to know which one is a better investment in the long run. The investment is not just a couple of hundred dollars, it is going to be an investment of time too.

  • R# “finds” Types as you try to use them and adds references and “using” directives from other projects in your solution. You will not believe how useful this is! You don’t have to interrupt your train of thought to go add references and “using” directives. CodeRush doesn’t do that.
  • I found R# “Create From Usage” feature incredibly useful with TDD. This feature will be available in Visual Studio 2010. They are calling it “Consume-First Development”.
  • R# has keyboard shortcuts for individual refactorings. All refactorings are accessible from ALT+ENTER or ALT+R. Again, R# helps you keep focused on the code you are writing.  In CodeRush, individual refactorings don’t have keyboard shortcuts.
  • R# allows me to specify exactly what to include when doing ExtractXXX refactorings. CodeRush doesn’t.
  • R# seems to know what I want to do. For example, when I discover that an existing class would be a good starting point to write the class I am thinking about and copy-paste the class and attempt to rename it, CodeRush renames both classes. R# renames the one you intend to rename.
  • R# introduces much less friction when running unit tests. It is possible to add unit-testing add-ins to Visual Studio and access similar functionality, but the way unit-testing is integrated into R#, it is much more conducive to TDD.
  • Collapse a class region. Now try to do a refactoring on this class, like “Rename file to match type” etc. In CodeRush, you will not be able to do it because the three-dot glyph will not be displayed when the class is collapsed.
  • CodeRush keeps getting in my way by automatically writing over as I type. It expands its “smart templates” when you press space. Guess what! That is how I separate words in my sentences – by pressing space. It gets quite annoying. I wish I could turn it off.

As you have probably guessed by now, I think ReSharper is a better fit for me.

Here is a list of some other comparisons, covering aspects and features of these products I haven’t mentioned here that might be important to you. Some of these concluded in favor of CodeRush. Keep in mind that some of the following articles are a couple of years old.

Database Schema Version Control Tool

It is essential to treat database schema as source code and apply all the norms and best practices applicable to it. From what I hear and read, database schema version control is non-existent in too many projects.

Various techniques to accomplish version control of database schemas have been discussed and published. Martin Fowler and Pramod Sadagale has written a comprehensive article on Evolutionary Database Design. It is a must-read for everyone involved with database development.

K. Scott Allen writes in detail about an excellent system here – Versioning Databases – Change Scripts. This approach is sufficiently light-weight (for my taste) and provides complete control over the whole process.

I am providing a free tool here that you can use to implement this system. It will even create the SchemaVersionsLog table for your database, if it doesn’t exist. If you are using this tool with MSSQL Server, you can get started with very little effort. If you are using a different DBMS, you can still use this tool. It uses NHibernate to access the SchemaVersionsLog table. So, any DBMS supported by NHibernate is acceptable, as long as it comes with a command line tool to execute the sql scripts.

Download DbUpdater here.