Giving OpenClaw Secure Access to Cloud Services Without Sharing Your Password

Device Code Flow has been built into OAuth2 for years, originally designed for TVs and game consoles. It works just as well for a Docker container. It requires no credentials stored on the agent machine. It gives you narrow, revocable access that the agent cannot exceed.

I have OpenClaw deployed in a sandboxed docker container on a dedicated host. I communicate with it via a Telegram bot, in a locked-down chat.

I wired the device-code authentication pattern up with OpenClaw and Microsoft (Personal/Consumer) services, but the authentication approach works with any app and any command-line tool you want to run in a headless environment, including Custom APIs. Device code flow + Entra ID app registrations give you a zero-stored-credentials gateway to any HTTP API you can build, not just Microsoft Graph.

What Is Device Code Flow?

OAuth2 device code flow (RFC 8628) was designed for “input-constrained devices” — things without a keyboard or a browser. Think of how you sign in to Netflix on a smart TV: a short code appears on screen, you visit a URL on your phone, you type the code in, and the TV logs in. You never type your password on the TV.

The official name for that pattern is the device authorization grant. A Docker container is, from the protocol’s perspective, exactly the same kind of device. It has no browser. It cannot perform an interactive redirect. But it can make HTTP requests, and that is all it needs.

The flow has three steps:

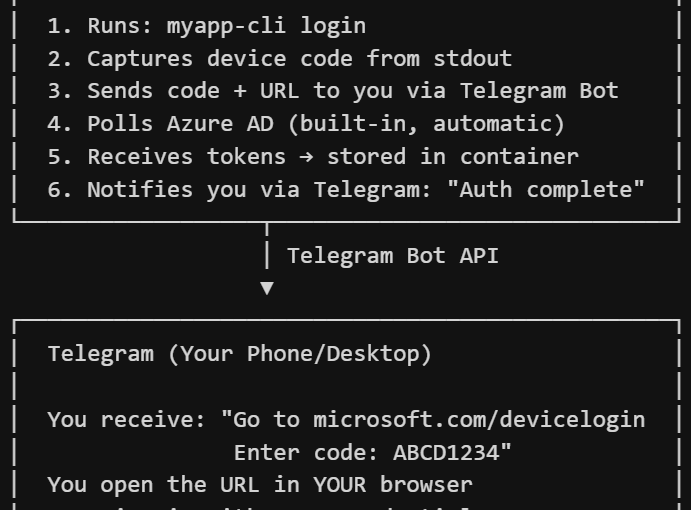
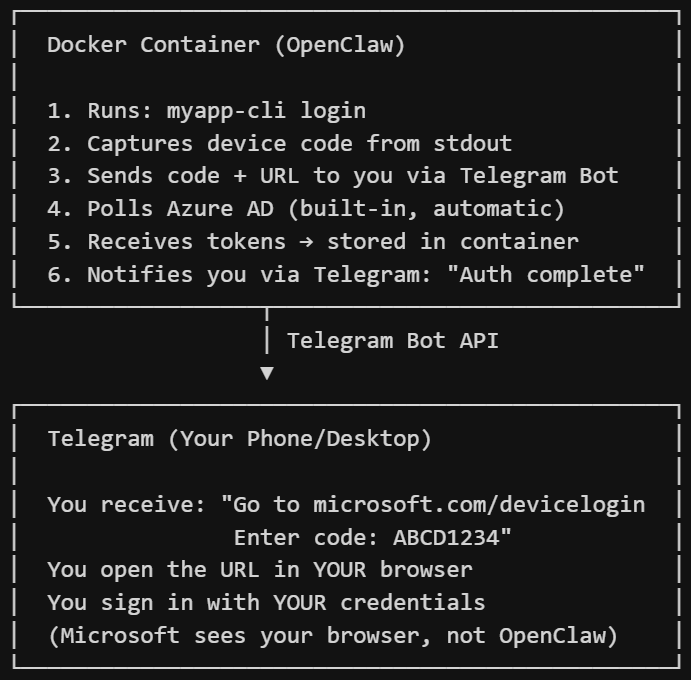
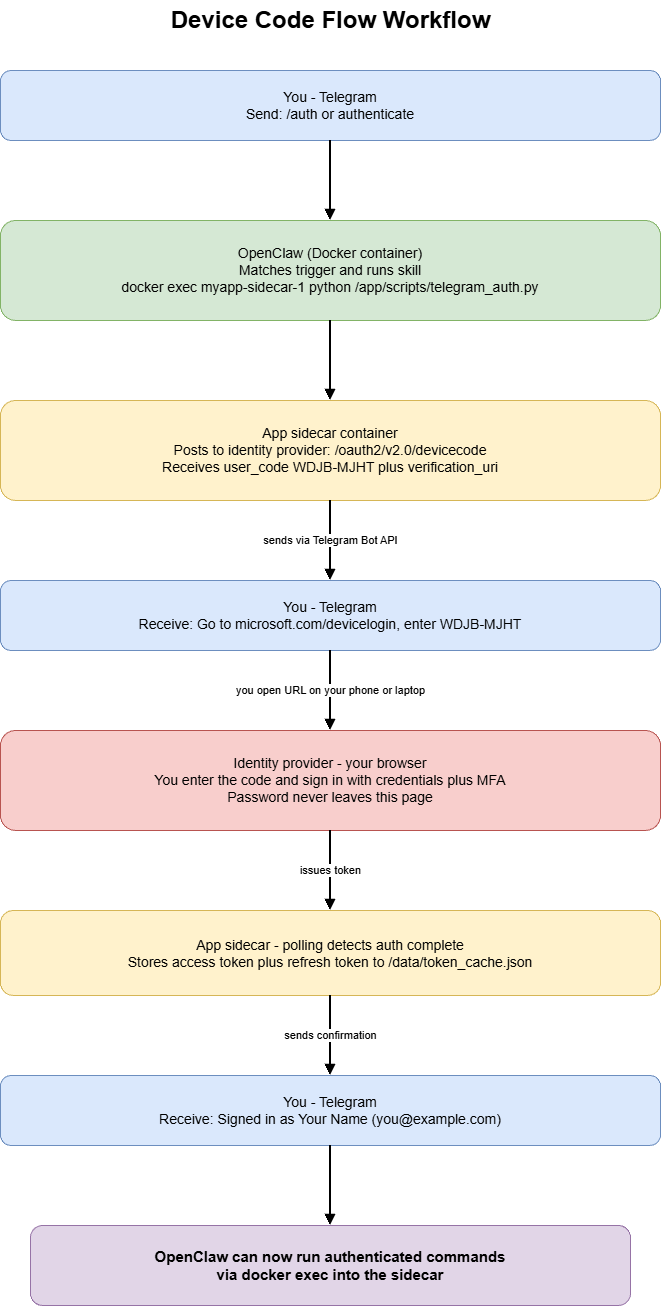
1. The app posts to the identity provider’s device code endpoint. It gets back a short user code (like “WDJB-MJHT”), a verification URL, and a polling device code.

2. The user visits the URL on any browser, on any device — their phone, laptop, anything — and enters the short code. They sign in normally, with their usual credentials and MFA if it is enabled.

3. The app polls the token endpoint in the background. Once the user finishes signing in, the poll returns a real access token and a refresh token. The app stores these and uses them for API calls going forward.

The app never sees the password. The password goes directly from the user’s browser to the identity provider. The app only ever handles two things: a short temporary code that it sends to the user, and a token that the identity provider gives back once the user has authenticated.

OpenClaw running in a Docker container fits this model exactly.

Which Services Support this?

Device code flow is not a Microsoft-only feature. It is a standard OAuth2 extension (RFC 8628) and most major identity providers support it — including Microsoft, Google, GitHub, and AWS. If a service uses Okta or Auth0 for identity, those support it too.

The Security Architecture

The agent never sees your credentials. Your password is typed in your browser, on your device, to your identity provider’s servers. It never touches the container. The agent only handles a short temporary code to give you, and a token issued by the provider once you have authenticated.

The device code is one-time and short-lived. After the user authenticates, the code is permanently invalidated. An intercepted code is useless without the user’s credentials and MFA.

Scopes define the ceiling. You configure the OAuth app or app registration to request only specific permissions. The agent cannot exceed those scopes. If you configure read-only access to email, the token cannot be used to send or delete email.

This is the authentication pattern that many of the consumer devices you already own use to access your accounts on your behalf. Your TV’s YouTube app, your smart home hub’s Google integration, the GitHub CLI you use on your workstation — these all use device flow. You have been trusting it for years without knowing what it was called.

How the implementation works

There are three components, and they run as separate Docker services that talk to each other through the Docker socket.

The app sidecar is your application container. It runs your CLI tool and your auth logic. It does nothing on its own. Its only job is to hold the authenticated token cache and execute commands on demand when OpenClaw calls into it.

OpenClaw is the AI agent container. It connects to Telegram, understands natural language, and knows which skills to run for which requests. It does not know anything about OAuth or your specific app. It just runs shell commands you specified and reports results back to you.

The Telegram auth bridge is a small script that lives inside the sidecar. It registers a device code callback, requests an auth flow, and uses the Telegram Bot API to forward the code to you — then confirms when authentication completes.

The compose file looks roughly like this:

```yaml
services:
  myapp-sidecar:
    image: ghcr.io/youruser/myapp:latest
    command: ["sleep", "infinity"]
    environment:
      - XDG_DATA_HOME=/data
      - TELEGRAM_BOT_TOKEN=${TELEGRAM_BOT_TOKEN}
      - TELEGRAM_CHAT_ID=${TELEGRAM_CHAT_ID}
    volumes:
      - ${APP_DATA_DIR:-./app-data}:/data
    restart: unless-stopped

  openclaw-gateway:
    build:
      context: .
      dockerfile: Dockerfile.openclaw
    volumes:
      - /var/run/docker.sock:/var/run/docker.sock
      - ./skills:/app/skills
    group_add:
      - "${DOCKER_GID:-999}"
    environment:
      - TELEGRAM_BOT_TOKEN=${TELEGRAM_BOT_TOKEN}
    ports:
      - "18789:18789"
    restart: unless-stopped
```

The Callback Pattern

The auth manager has a method called set_device_code_callback. You pass it a function, and when the device code is ready, the auth manager calls your function with the code and the verification URL rather than trying to open a browser.

```python
class AuthManager:
    def __init__(self, client_id: str, authority: str) -> None:
        self._client_id = client_id
        self._authority = authority.rstrip("/")
        self._on_device_code = None
        self._tokens = self._load_cache()

    def set_device_code_callback(self, fn) -> None:
        self._on_device_code = fn

    async def _device_code_auth(self) -> None:
        async with httpx.AsyncClient() as client:
            resp = await client.post(
                f"{self._authority}/oauth2/v2.0/devicecode",
                data={"client_id": self._client_id, "scope": OAUTH_SCOPES},
                timeout=30,
            )
        flow = resp.json()
        user_code = flow["user_code"]
        verification_uri = flow["verification_uri"]
        device_code = flow["device_code"]
        interval = flow.get("interval", 5)
        expires_in = flow.get("expires_in", 300)

        if self._on_device_code:
            self._on_device_code({
                "user_code": user_code,
                "verification_uri": verification_uri,
                "message": flow.get("message", ""),
            })
        else:
            try:
                webbrowser.open(verification_uri)
            except Exception:
                pass

        deadline = time.time() + expires_in
        while time.time() < deadline:
            await asyncio.sleep(interval)
            async with httpx.AsyncClient() as client:
                resp = await client.post(
                    f"{self._authority}/oauth2/v2.0/token",
                    data={
                        "client_id": self._client_id,
                        "grant_type": "urn:ietf:params:oauth:grant-type:device_code",
                        "device_code": device_code,
                    },
                    timeout=30,
                )
            body = resp.json()
            if resp.status_code == 200 and "access_token" in body:
                self._store_tokens(body)
                return
            error = body.get("error", "")
            if error == "authorization_pending":
                continue
            elif error == "slow_down":
                interval += 5
            elif error in ("authorization_declined", "expired_token"):
                raise AuthError(error)
            else:
                raise AuthError(body.get("error_description", "Auth failed"))
```

The polling loop handles the three error codes the spec defines: authorization_pending (keep waiting), slow_down (back off and increase the interval by 5 seconds), and the terminal errors that stop polling.

The Telegram Bridge

With the callback mechanism in place, the Telegram bridge is just a script that registers a callback and uses the Telegram Bot API to deliver the code to you:

```python
import asyncio, os, sys, traceback
import httpx
from your_app.auth import AuthManager
from your_app.config import Settings

TELEGRAM_BOT_TOKEN = os.environ["TELEGRAM_BOT_TOKEN"]
TELEGRAM_CHAT_ID = os.environ["TELEGRAM_CHAT_ID"]

async def send_telegram(text: str) -> None:
    url = f"https://api.telegram.org/bot{TELEGRAM_BOT_TOKEN}/sendMessage"
    async with httpx.AsyncClient() as client:
        await client.post(url, json={
            "chat_id": TELEGRAM_CHAT_ID,
            "text": text,
            "parse_mode": "Markdown",
        }, timeout=30)

async def main() -> int:
    settings = Settings()
    auth = AuthManager(settings.client_id, settings.authority)

    if auth.is_signed_in():
        await send_telegram("Already authenticated.")
        return 0

    def on_device_code(info: dict) -> None:
        msg = (
            "*Auth Required*\n\n"
            f"Go to: {info['verification_uri']}\n"
            f"Enter code: `{info['user_code']}`\n\n"
            "Complete sign-in in your browser and I'll confirm when done."
        )
        try:
            asyncio.get_event_loop().create_task(send_telegram(msg))
        except RuntimeError:
            import requests
            requests.post(
                f"https://api.telegram.org/bot{TELEGRAM_BOT_TOKEN}/sendMessage",
                json={"chat_id": TELEGRAM_CHAT_ID, "text": msg, "parse_mode": "Markdown"},
                timeout=10,
            )

    auth.set_device_code_callback(on_device_code)
    try:
        user_info = await auth.sign_in()
        await send_telegram(f"*Signed in* as {user_info['name']} ({user_info['email']})")
        return 0
    except Exception as exc:
        await send_telegram(f"*Auth failed:* {exc}\n```{traceback.format_exc()[:800]}```")
        return 2

if __name__ == "__main__":
    sys.exit(asyncio.run(main()))
```

The OpenClaw Skill

On the OpenClaw side, a “skill” is a markdown file. When OpenClaw sees a trigger phrase in Telegram, it runs the associated shell command. The markdown file looks like this:


name: myapp-auth
description: Authenticate with the cloud service via device code flow, coordinated through Telegram.


## myapp-auth

Use this skill when the user sends “/auth”, “authenticate”, or “sign in”.

Run the following command and wait up to 360 seconds for it to complete.
The script sends the device code to the user via Telegram and confirms when done.

docker exec myapp-sidecar-1 python /app/scripts/telegram_auth.py

Summary

Device code flow is a mature, widely-supported OAuth2 pattern that maps naturally onto OpenClaw running in Docker container. With this pattern OpenClaw never handles your credentials. It gets scoped, revocable tokens from the identity provider, after you have authenticated in your own browser. A Telegram bot is all you need to coordinate the handoff of the temporary code.

The approach works for many use-cases across Microsoft accounts, Google, GitHub, AWS, Auth0, Okta and others. It supports exactly the kinds of personal automations that make an OpenClaw genuinely useful in daily life.

References

Security Analysis of Etheruem Smart Contracts with Mythril

Mythril is an open-source security analysis tool for EVM bytecode, courtesy of ConsenSys. It is also a component of their Security Analysis Service – Mythx. Mythril detects security vulnerabilities in smart contracts built for Ethereum and other EVM-compatible blockchains.

Vulnerabilities found by Mythril are reported with reference to the weaknesses listed on the Smart Contract Weakness Classification Registry (SWC Registry). I will use two entries from SWC Registry for the examples in this article:

  • SWC-106 – Due to missing or insufficient access controls, malicious parties can self-destruct the contract.
  • SWC-107 – One of the major dangers of calling external contracts is that they can take over the control flow. In the reentrancy attack (a.k.a. recursive call attack), a malicious contract calls back into the calling contract before the first invocation of the function is finished.

Install Mythril on Windows

> docker import mythril/myth

https://mythril-classic.readthedocs.io/en/master/installation.html

Get test files from github

Source code for these tests is on github : mythril-tests. Clone the repo locally and adjust the paths in the commands below to match your local environment.

Analyze a local smart contract

Analysis of SelfDestructMultiTxFeasible.sol

> docker run -v E:\share\:/data mythril/myth -v4 analyze /data/mythx-tests\05222022-25/SelfDestructMultiTxFeasible.sol

Mythril reports an instance of SWC-106 vulnerability:


Analysis of SimpleDAO.sol

> docker run -v E:\share\:/data mythril/myth -v4 analyze /data/mythx-tests\05222022-25/SimpleDAO.sol

Mythril reports three instances of SWC-107 and one instance of SWC-105:

Analysis of a flatenned contract file

File containing the two test contracts returns five instances of vulnerabilities of both contracts:

> docker run -v E:\share\:/data mythril/myth -v4 analyze /data/mythx-tests\05222022-25/flatenned-01.sol

Analyze a contract with imported contract

Most smart contracts import other contracts to reuse functionality. You do not have to flatten the contracts into one file. Mythril can work with contracts with imports specified in them : SimpleDAOWithImport.sol

> docker run -v E:\share\:/data mythril/myth -v4 analyze /data/mythx-tests\05222022-26/SimpleDAOWithImport.sol

Analyze a contract with @OpenZeppelin style import

Mythril relies on solc for compiling contract source code. For @OpenZeppelin style imports, you have to specify –solc-json file containing remapping for solc to locate the referenced files : SimpleDAOWith-OzImport.sol

> docker run -v E:\share\:/data mythril/myth -v4 analyze /data/mythx-tests\05222022-26/SimpleDAOWith-OzImport.sol –solc-json=/data/solc-args.json

Analyzing On-Chain Contracts

Mythril can analyze contracts deployed on the blockchain directly. You do not need source code of the contract. Support for infura is built-in, you can also use custom RPC endpoint. Replace INFURA_ID with your Infura project id and CONTACT_ADDRESS with the address of your contract on the blockchain :

> docker run mythril/myth -v4 analyze –rpc infura-rinkeby –infura-id INFURA_ID -a CONTACT_ADDRESS

KeyNode with Node.js and Microsoft Azure

KeyNode is a application to issue and verify software license keys. Technology stack for KeyNode is Node.js, MongoDB and Microsoft Azure.

I had built this functionality with C9.io (a cloud-based IDE with a built-in source code repository and debugger), mongohq (MongoDB as a service – now part of compose.io) and appfog (Cloud PAAS built on top of CloudFoundry). It used SMTP/gmail to email license files. That was the version I created a couple of years ago to issue tamper-proof signed xml license files for CodeDemo (a code snippet tool for developers, presenters and instructors).

For KeyNode (open source) I switched to a different toolset : Visual Studio Code and Windows Azure, simplified the code to remove signed xml file and open-sourced it on GitHub. Signed xml allowed offline verification in CodeDemo (a Wpf/Desktop app). Removing signed xml requires verification to happen online. I am working on adding the web endpoint for verification of license keys. This version uses SendGrid to email license keys. KeyNode is deployed as a Windows Azure Web App. The Azure Web App is on Continuous Deployment feed from the source code repository on GitHub.

I created and tested this Node.js application locally without IIS and deployed it as an Azure Web App without making any changes to the code at all. Node.js applications are hosted in Azure under IIS with iisnode. Iisnode is a native IIS module that allows hosting of node.js applications in IIS on Windows. Read more about iisnode here. Iisnode architecture also makes it significantly easier to take advantages of scalability afforded by Azure.

KeyNode is a work in progress. My plan is to use this as the basis for further explorations in the following areas :

  • DevOps, Docker and Microservices (at miniature scale of course!)
  • Create a Web UI with Express (a Node.js web application framework)
  • Integrate with Azure Storage/Queues
  • and more…

I invite you to check out the live site on Azure and fork it for your own experiments : KeyNode on GitHub.

Resources :

Photo Credit : Piano Keyboard (www.kpmalinowski.pl)

Using Powershell with Splunk

Splunk Powershell Resource Kit is a convenient and very capable wrapper over Splunk REST API. You can use the Powershell commandlets exposed by this resource kit to deploy, check and manage splunk services as well as execute splunk searches. In this post, you will be introduced to the Splunk Powershell Resource Kit, you will learn how to use powershell commandlets to connect to a splunk instance and execute searches.

1. First, you will need to download the resource kit from github.
2. Installation is very simple. All you have to do is download and extract the files from the zip archive and double click on install.bat to install the splunk powershell module.
3. Open Windows Powershell console from Windows Start menu.
4. Verify that the Splunk module is installed by executing Get-Module commandlet.

Get-Module SplunkSearch

5. Import splunk resource kit commandlets using Import-Module command.

Import-Module -Name Splunk

6. Next, you need to use Get-Credentials and then Connect-Splunk commandlets to connect to splunk. You need to do this once per session or if you need to switch to a different splunk instance.

$credential = Get-Credential
Connect-Splunk -Credential $credential -ComputerName localhost

I have a local Splunk Enterprise instance running on my machine, so I am using localhost as the ComputerName to connect to it. If you have a SplunkCloud subscription you can use YourSubscriptionId.splunkcloud.com as the ComputerName to connect to your subscription. Like so –

Connect-Splunk -Credential $credential -ComputerName MySubscription.splunkcloud.com

7. Next, use Search-Splunk commandlet to execute searches –

Search-Splunk -Search "Error"

Here is a sample script:

$lastDay = ( get-date ).addDays( -1 ).toString( ‘s’ )

$searches = @(
    "ERROR"
    , "source=""tutorialdata.zip:*"" ERROR"
    , "CreditDoesNotMatch"
    ,"source=""tutorialdata.zip:.\\www3/access.log"" productId=WC-SH-G04"
)

Write-Output $lastDay
foreach($search in $searches)
{
    $qry = $search + " | stats count"
    Write-Output $qry
    Search-Splunk -Search $qry -StartTime $lastDay | Select-Object -ExpandProperty Count
}

The sample script executes multiple Splunk searches and outputs the count of results matching these search queries. Note that I am “-StartTime” parameter to scope the search to a narrower time window and “stats count” command to get the count of results. You can get this sample script as a github gist.

You can also use -EndTime and –MaxReturnCount to further constrain the query results and Format-List, Format-Table, Format-Wide commands to format the results. You can learn more about other Search parameters as well as other capabilities exposed in the resource kit documentation.

Resources :

  1. Splunk Powershell ResourceKit
  2. Splunk Powershell ResourceKit on github
  3. Splunk Powershell ResourceKit Documentation

Image credit : terminal by Andrea Mazzini from the Noun Project

The Site44 Workflow

A light weight development workflow with real-time website deployment.

I recently built a sample website to illustrate how clean, semantic html markup can be maintained when using Bootstrap’s grid system. The solution is to use a css pre-processor to incorporate Bootstrap’s LESS based mixins into your own .less files and push the Bootstrap instructions down into your stylesheets. There are two ways to “compile” .less stylesheets – use a stand-alone LESS compiler or use less.js. I found it very convenient to use less.js (note that it is not recommended in production deployment). As I started working on developing the sample code I found it a bit cumbersome to work with an entire web application project in Visual Studio, considering I was working with some really simple sample client-side html, css. As I craved for an alternative, I stumbled on to a development workflow that is incredibly simple and a lot of fun. I call it the Site44 workflow. Site44 turns your dropbox folders into websites. And it is awesome! Here is what you do –

1. Sign into Site44.com using your dropbox credentials.

2. Create a new site (all you have to do is come up with a name). I named it “ash”. A sub-folder with this name will show up in your dropbox folder.

3. Drag this folder to your Github for Windows screen and drop it there to create a github repo in that folder and push it to github.

4. Smile and write code.

As you save your code. The changes are deployed in real-time to your website. You commit to your github repo as you please. If you revert to a different version/branch of our code from your git repo, that version will be deployed (almost) instantly to your website. I wish there was a .site44ignore feature in Site44, just like .gitignore. That will allow me to keep my .git folder (and some other files) from getting published to the website. Other than that, this worked out really well for me.

I wrote about the experience of extending Bootstrap with LESS here : Bootstrap with LESS.

Hat tip to Justin Saraceno for introducing me to site44.


Understanding and Using System.Transactions

These are some resources to help grasp System.Transactions functionality and use it effectively in your projects:

Features Provided by System.Transactions
http://msdn.microsoft.com/en-us/library/vstudio/ee818755(v=vs.100).aspx
Implementing an Implicit Transaction using Transaction Scope
http://msdn.microsoft.com/en-us/library/vstudio/ee818746(v=vs.100).aspx
MSDN Articles by John Papa
ADO.NET and System.Transactions
http://msdn.microsoft.com/en-us/magazine/cc163847.aspx
Revisiting System.Transactions
http://msdn.microsoft.com/en-us/magazine/cc163527.aspx
These are specific to TransactionScope (the way to go in most cases)
Here is a practical example of Using TransactionScope :
http://thewayofcode.wordpress.com/2011/12/11/handling-transactions-in-net-using-transactionscope/
This one gets in depth with the way a TransactionScope like functionality can be implemented. Gives you a good understanding of what is happening under the hood when using TransactionScope in some Repository implementations in multi-threaded scenarios.
http://msdn.microsoft.com/en-us/magazine/cc300805.aspx
Here is another example of implementing a transactional repository :
http://www.codeproject.com/Articles/31270/A-Transactional-Repository-Implementation-in-NET
There are excellent tips here about configuring TransactionScope when used with SQL Server:
http://blogs.msdn.com/b/dbrowne/archive/2010/06/03/using-new-transactionscope-considered-harmful.aspx
This is a good resource for CommitableTransaction usage – http://www.codeproject.com/Articles/55472/Committable-Transactions-in-C-SQL
And this one has brilliant under-the-hood coverage – http://www.codeproject.com/Articles/35087/Truly-Understanding-NET-Transactions-and-WCF-Impl