You can connect to Azure Kubernetes Service (AKS) nodes using ssh. It is documented here: Connect with SSH to Azure Kubernetes Service (AKS) cluster nodes for maintenance or troubleshooting.
I needed to access nodes on the System node pool for collecting some logs recently, but the process documented above was not working for me. It turns out that there were two different issues, both related to adding your SSH keys to the nodes in a virtual machine scale set (VMSS).
This is the az cli command that adds the ssh keys to the VMSS:
az vmss extension set  \
    --resource-group $CLUSTER_RESOURCE_GROUP \
    --vmss-name $SCALE_SET_NAME \
    --name VMAccessForLinux \
    --publisher Microsoft.OSTCExtensions \
    --version 1.4 \
    --protected-settings "{\"username\":\"azureuser\", \"ssh_key\":\"$(cat ~/.ssh/id_rsa.pub)\"}"
I was running this command from powershell on a windows host. So, the first modification I needed was to escape the double quotes by doubling them. You can also use back ticks instead of doubling the double quotes.
az vmss extension set  \
    --resource-group $CLUSTER_RESOURCE_GROUP \
    --vmss-name $SCALE_SET_NAME \
    --name VMAccessForLinux \
    --publisher Microsoft.OSTCExtensions \
    --version 1.4 \
    --protected-settings "{\""username\"":\""azureuser\"", \""ssh_key\"":\""$(cat ~/.ssh/id_rsa.pub)\""}"
The second issue was due to the fact that ssh-keygen adds a comment to the id_rsa.pub file. By default, it adds username@hostname as the comment at the end of the file . Normally, this comment wouldn’t cause any problems, but in this case it was causing an error – “Invalid escape sequence \uXXXX”.
The problem was that my domain user name starts with character ‘u’ and “domain\userid1” was being interpreted as containing a unicode character “\useri” which is obviously not a valid unicode character. The workaround here is to either delete the comment from the id_rsa.pub file (it works just fine without it) or to override the default comment when generating the ssh key by specifying your own comment via -C command line option.
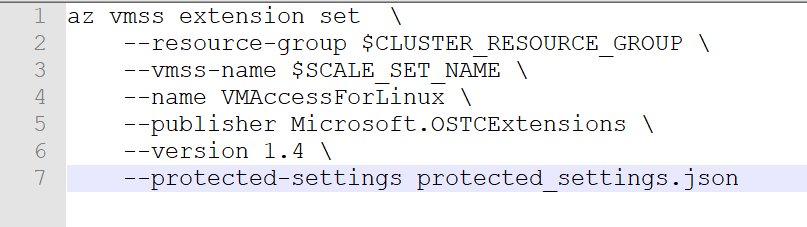
ssh-keygen -C mycommentFinally, there is another way to execute az vmss extension set command to get around both of these issues by creating a json file and passing that as the value of –protected-settings argument. Here is how –
- Create a json file, protected_settings.json, with the following content:
{
	"username" : "azureuser",
	"ssh_key" : "REPLACE_THIS_WITH_CONTENT_OF_ID_RSA_PUB_FILE"
}- Pass this file as the command line argument:
az vmss extension set  \
    --resource-group $CLUSTER_RESOURCE_GROUP \
    --vmss-name $SCALE_SET_NAME \
    --name VMAccessForLinux \
    --publisher Microsoft.OSTCExtensions \
    --version 1.4 \
    --protected-settings protected_settings.json
Works like a charm!