AKS – Adding SSH Keys to VMSS Nodes

You can connect to Azure Kubernetes Service (AKS) nodes using ssh. It is documented here: Connect with SSH to Azure Kubernetes Service (AKS) cluster nodes for maintenance or troubleshooting.

I needed to access nodes on the System node pool for collecting some logs recently, but the process documented above was not working for me. It turns out that there were two different issues, both related to adding your SSH keys to the nodes in a virtual machine scale set (VMSS).

This is the az cli command that adds the ssh keys to the VMSS:

az vmss extension set  \
    --resource-group $CLUSTER_RESOURCE_GROUP \
    --vmss-name $SCALE_SET_NAME \
    --name VMAccessForLinux \
    --publisher Microsoft.OSTCExtensions \
    --version 1.4 \
    --protected-settings "{\"username\":\"azureuser\", \"ssh_key\":\"$(cat ~/.ssh/id_rsa.pub)\"}"

I was running this command from powershell on a windows host. So, the first modification I needed was to escape the double quotes by doubling them. You can also use back ticks instead of doubling the double quotes.

az vmss extension set  \
    --resource-group $CLUSTER_RESOURCE_GROUP \
    --vmss-name $SCALE_SET_NAME \
    --name VMAccessForLinux \
    --publisher Microsoft.OSTCExtensions \
    --version 1.4 \
    --protected-settings "{\""username\"":\""azureuser\"", \""ssh_key\"":\""$(cat ~/.ssh/id_rsa.pub)\""}"

The second issue was due to the fact that ssh-keygen adds a comment to the id_rsa.pub file. By default, it adds username@hostname as the comment at the end of the file . Normally, this comment wouldn’t cause any problems, but in this case it was causing an error – “Invalid escape sequence \uXXXX”.

The problem was that my domain user name starts with character ‘u’ and “domain\userid1” was being interpreted as containing a unicode character “\useri” which is obviously not a valid unicode character. The workaround here is to either delete the comment from the id_rsa.pub file (it works just fine without it) or to override the default comment when generating the ssh key by specifying your own comment via -C command line option.

ssh-keygen -C mycomment

Finally, there is another way to execute az vmss extension set command to get around both of these issues by creating a json file and passing that as the value of –protected-settings argument. Here is how –

  • Create a json file, protected_settings.json, with the following content:
{
	"username" : "azureuser",
	"ssh_key" : "REPLACE_THIS_WITH_CONTENT_OF_ID_RSA_PUB_FILE"
}
  • Pass this file as the command line argument:
az vmss extension set  \
    --resource-group $CLUSTER_RESOURCE_GROUP \
    --vmss-name $SCALE_SET_NAME \
    --name VMAccessForLinux \
    --publisher Microsoft.OSTCExtensions \
    --version 1.4 \
    --protected-settings protected_settings.json

Works like a charm!

AKS Supported Kubernetes Versions

Azure Kubernetes Service (AKS) supports specific versions of Kubernetes.
It is necessary to regularly monitor the release of new versions and upgrade your AKS clusters to supported versions in order to remain in compliance with AKS Kubernetes Version Support Policy.

AKS announces the planned date of a new minor version release and corresponding old version deprecation via AKS Release notes at least 30 days prior to removal. An email notification is sent to the subscription administrators with the planned version removal dates. You get 30 days from version removal to upgrade to a supported minor version release. Patch versions can be released anytime and you get 30 days from the removal date to upgrade to a supported patch version.

You should test new target Kubernetes versions and upgrade your AKS clusters in a timely manner. For that, it is necessary to proactively monitor the AKS release notes. This can easily become a chore in a large Enterprise environment. Here is a Powershell script to make it easier to stay on top of Kubernetes version releases in AKS and publish/share it with others: Get-AksSupportedVersions.

$aksVersionsJson = az aks get-versions --location eastus

$aksVersions = $aksVersionsJson | ConvertFrom-Json
$aksVersions.orchestrators.upgrades.orchestratorVersion 

$data = $aksVersions.orchestrators | Select-Object `
    -Property @{Name="Version";Expression={$_.orchestratorVersion}} `
            , @{Name="Default";Expression={$_.default}} `
            , @{Name="Preview";Expression={$_.isPreview}} `
            , @{Name="Upgrades";Expression={$_.upgrades.orchestratorVersion -join ", "}}

$versionTable = $data | ConvertTo-Html -Fragment 
$versionTableString = $versionTable | Out-String
$html = New-Object -ComObject "HTMLFile"
$html.IHTMLDocument2_write($versionTableString)
$tables = $html.body.getElementsByTagName("table")

$rptString = ""
ForEach($table in $tables){
    ForEach($row in $table.rows){
            $cellCount = 0
            ForEach($cell in $row.cells){
                $cellCount++
                if(($cellCount -eq 2) -and ($cell.innertext -eq 'True'))
                {
                    $row.className = "OkStatus"
                }
                if(($cellCount -eq 3) -and ($cell.innertext -eq 'True'))
                {
                    $row.className = "WarningStatus"
                }
        }
    }
    $rptString += $table.outerHTML
}

$reportDate = $(get-date -DisplayHint DateTime) | Out-String
$fileTS = $(get-date -Format "yyyyMMdd") 
$fileName = "aks-versions-$fileTS.html"

$rptTitle = "<h1>AKS Kubernetes Versions</h1><p>$reportDate</p>"
$report = ConvertTo-Html -Title "AKS Versions" -Body "$rptTitle $rptString" -Head $header
$report | Out-File "$fileName"

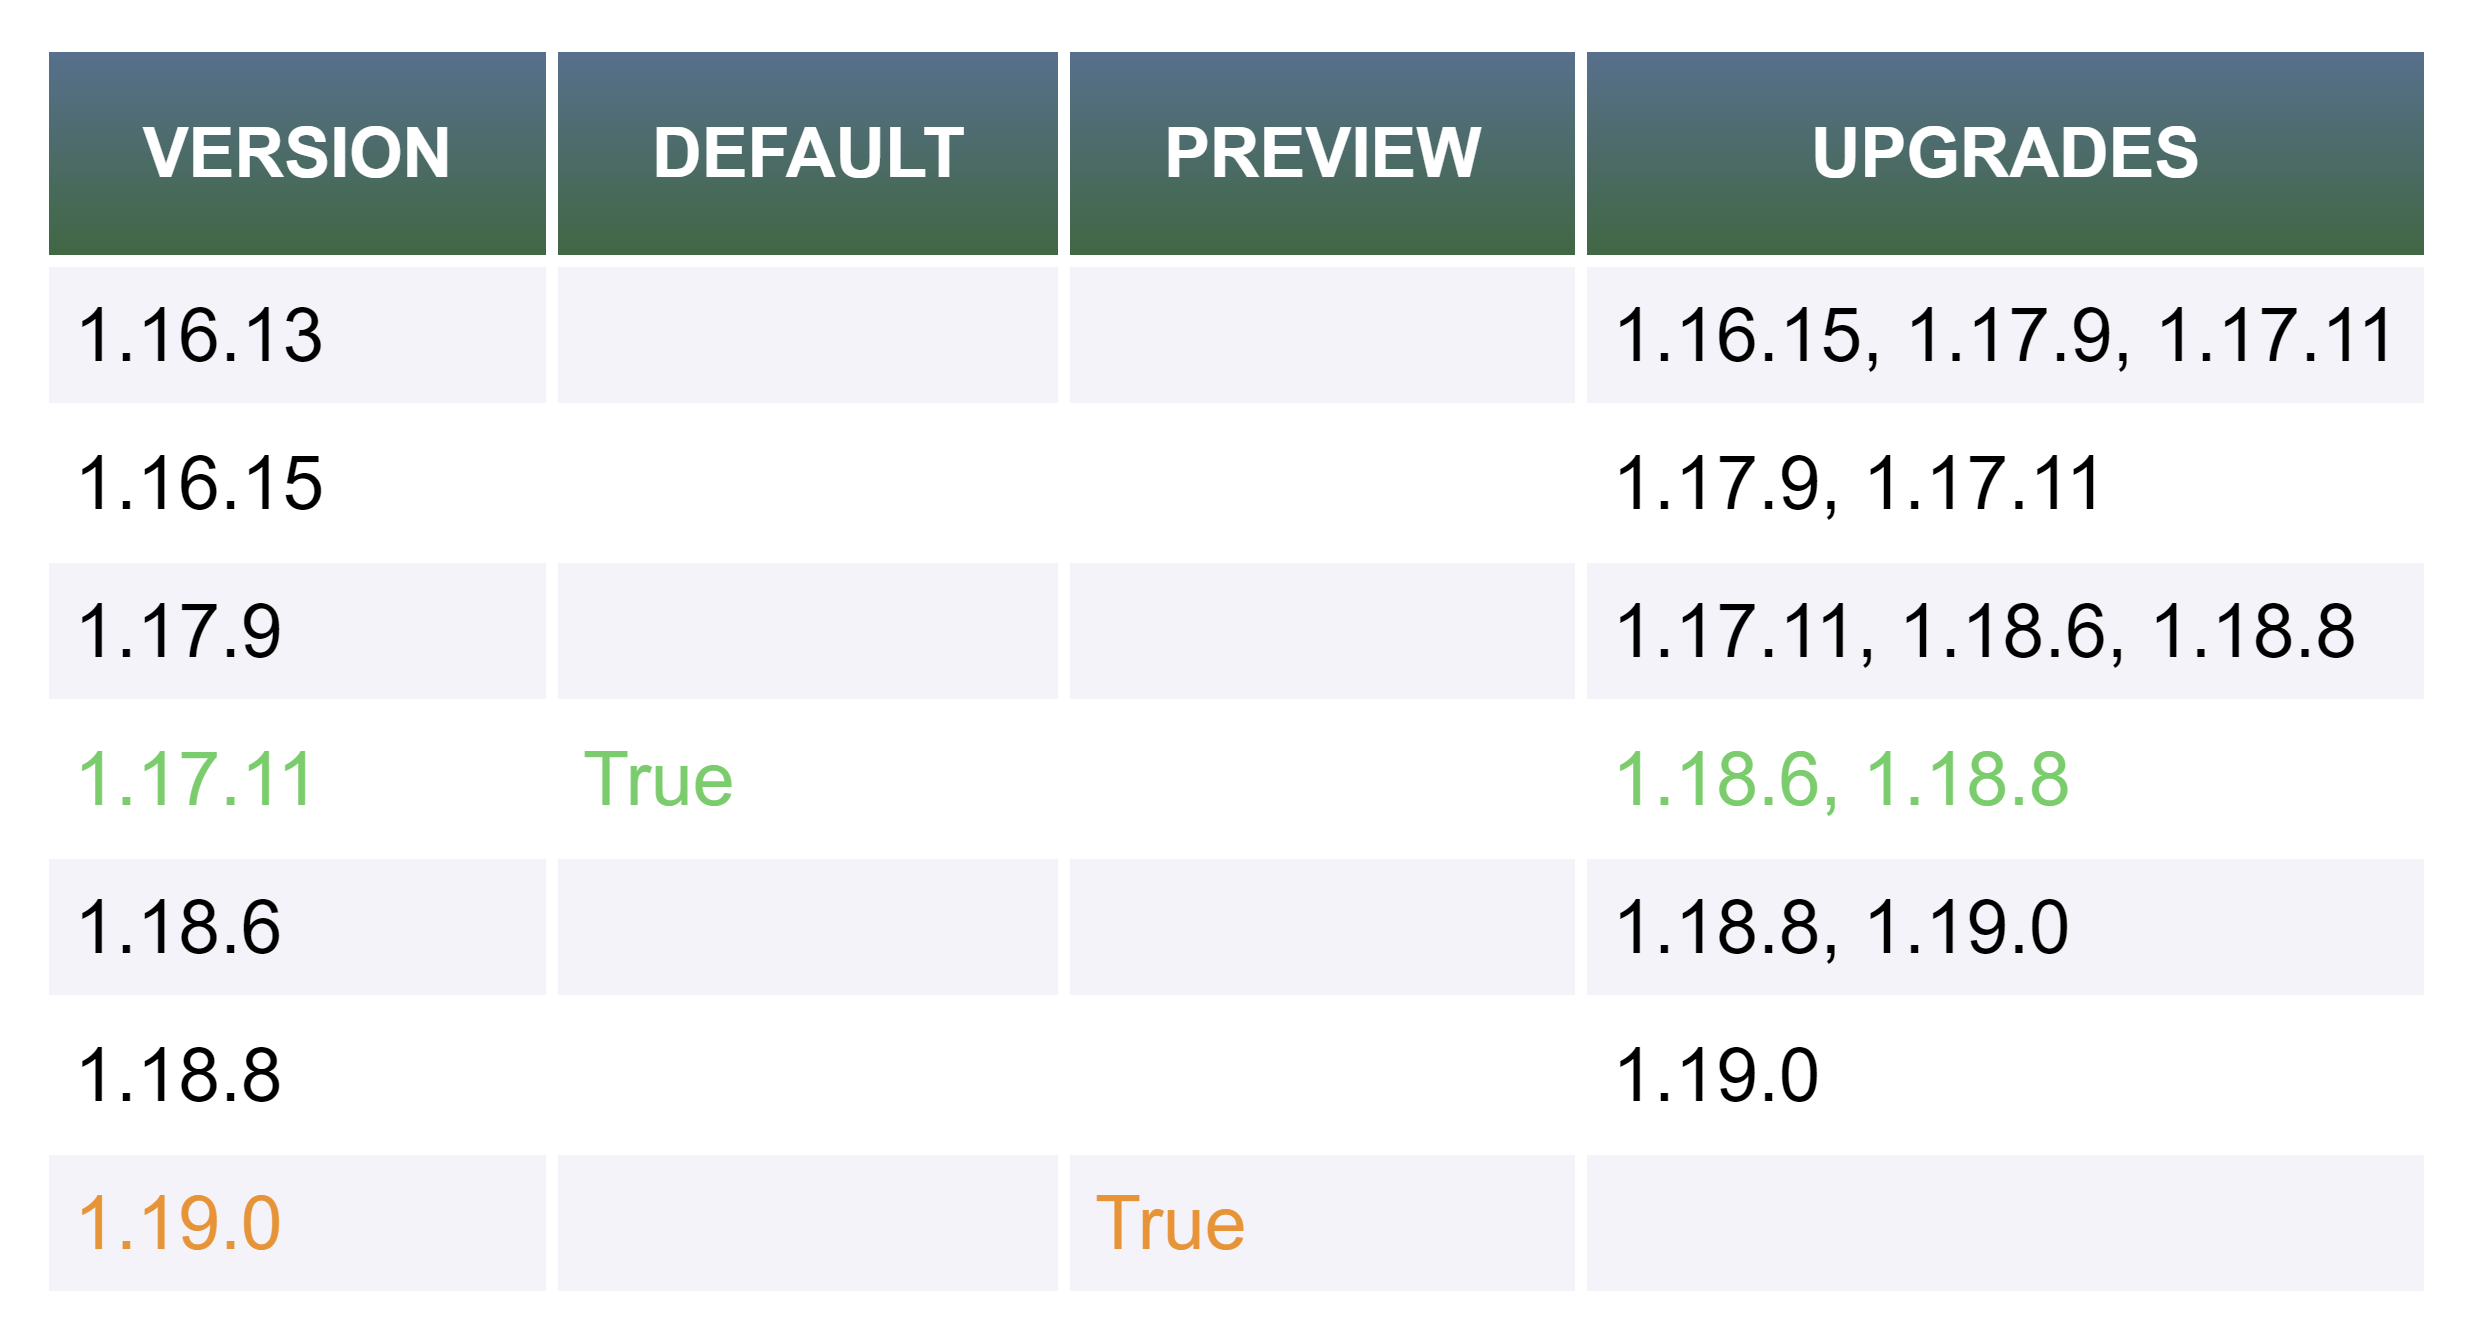
It creates an HTML report of currently supported Kubernetes versions in AKS along with their respective upgrade paths. Here is an example of the report generated by the script referenced above :

AKS Kubernetes Versions

Sunday, November 8, 2020 8:47:42 PM

Version Default Preview Upgrades
1.16.13 1.16.15, 1.17.9, 1.17.11
1.16.15 1.17.9, 1.17.11
1.17.9 1.17.11, 1.18.6, 1.18.8
1.17.11 True 1.18.6, 1.18.8
1.18.6 1.18.8, 1.19.0
1.18.8 1.19.0
1.19.0 True

Reference: How To Create An HTML Report With PowerShell

Universal Windows Platform Application on Raspberry Pi

Universal Windows Platform (UWP) provides a common app platform on every device that runs Windows 10. The core APIs in UWP are the same on all Windows devices – including Desktop PC, Mobile Phone, XBox, Hololens, IOT devices and others

You can target specific device capabilities of a device family with extension SDKs, but you don’t have to do that if you are only using core APIs. Those core APIs include a very impressive set of UI capabilities. What that means is that you can create a UWP application using C# and XAML which will run on an ARM based processor on Raspberry Pi – because Windows 10 IOT Core runs on that.

Universal Windows Platform (UWP) has come a long way. I decided to dust off my good old Raspberry Pi 2B and take it for a spin last weekend.

The goal was simply to create a Hello World UWP application, deploy it on Windows 10 IOT running on Raspberry Pi (RPi), without using any device specific extension SDKs. Here is the stack – 

Create a simple UWP application in Visual Studio 2019. 

Install Windows 10 IOT Core on Raspberry Pi 2B and connect the device to a 50″ screen TV. 

Select ARM in the target platform drop down and Click on Remote Machine to Run/Debug Application on RPi device.

Select RPi device for deployment.

Deployment of UWP on RPi is complete. 

UWP application running on RPi. 

I updated the UWP application to include Syncfusion Chart control. Did you know that you can get a Community License for the entire product line (including Blazor, Xamarin and UWP controls) from Syncfusion?

UWP application is now running on RPi, attached to the Visual Studio debugger running on the development machine (Windows Surface). 

No device specific extension SDKs were referenced, just the core UWP APIs were used.

Code is on github.

Getting started with Blockchain

Washington DC – May 2019

In this session, we will introduce you to the world of Blockchain technology. We will start with the fundamentals and explain the characteristics and use cases of Blockchains and Decentralized applications. We will explain public Blockchains as well as permissioned Blockchains – with examples from Ethereum and Hyperledger. You will learn how to create a private blockchain to get started. You will learn about Ethereum and how to program Smart Contracts for Ethereum Blockchain. We will also share best practices for secure and effective Smart Contracts development.

Image Credit: DavidstankiewiczBlockchain Illustration 2CC BY-SA 4.0

TRINUG – Programming Smart Contracts on Ethereum Blockchain

TRINUG – Main Meeting : Programming Smart Contracts on Ethereum Blockchain – August 2018

In this session, Ash will introduce you to the world of Blockchain programming. You will learn about Ethereum and how to program Smart Contracts for Ethereum Blockchain. You will learn how to deploy and test your Contracts on a public Ethereum Testnet. Ash will share best practices for Smart Contract development. You will be able to participate in a hands-on walk-through in the latter half of the session.

ppt-20180808

Charlotte IOT – Programming Smart Contracts on Ethereum Blockchain

Charlotte IOT – July 2018

You will not want to miss this chance to learn about Blockchain, a technology enabling an entire IoT ecosystem! It has a distributed database for all the transactions, which eliminates the need for the third party to authenticate the transactions. The database ledger is a continuously growing list of records, called blocks, which are linked and secured using cryptography.
Charlotte IoT wants to thank Ash Tewari for traveling from Raleigh to share his extensive knowledge and experience around Blockchain. In this session, Ash will introduce you to the world of Blockchain programming. You will learn about Ethereum and how to program Smart Contracts on Ethereum Blockchain. You will learn how to deploy and test your code on a public Ethereum Testnet. Ash will complete the session with sharing some best practices for Smart Contract development. You will be able to participate in a hands-on walkthrough in the latter half of the session.

ppt-20180710